Eye-supported target selection
This page discusses different options for accessing eye gaze data and eye gaze specific events to select targets in MRTK. Eye tracking allows for fast and effortless target selections using a combination of information about what a user is looking at with additional inputs such as hand tracking and voice commands:
- Look & Say "Select" (default voice command)
- Look & Say "Explode" or "Pop" (custom voice commands)
- Look & Bluetooth button
- Look & Pinch (i.e., hold up your hand in front of you and bring your thumb and index finger together)
- Please note that for this to work, the hand rays need to be disabled
To select holographic content using eye gaze, there are several options:
1. Use the primary focus pointer:
This can be understood as your prioritized cursor. By default, if the hands are in view, then this would be hand rays. If no hands are in view, then the prioritized pointer would be head or eye gaze. Thus, please note that based on the current design head or eye gaze is suppressed as a cursor input if hand rays are used.
For example:
A user wants to select a distant holographic button. As a developer, you want to provide a flexible solution that allows the user to achieve this tasks in various conditions:
- Walk up to the button and poke it
- Look at it from a distance and say "select"
- Target the button using a hand ray and performing a pinch In this case, the most flexible solution is to use the primary focus handler as it will notify you whenever the currently prioritized primary focus pointer triggers an event. Please note that if hand rays are enabled, the head or eye gaze focus pointer are disabled as soon as the hands come into view.
Important
Please note that if hand rays are enabled, the head or eye gaze focus pointer are disabled as soon as the hands come into view. If you want to support a 'look and pinch' interaction, you need to disable the hand ray. In our eye tracking sample scenes, we have disabled the hand ray to allow for showcasing richer interactions using eyes + hand motions - see for example Eye-Supported Positioning.
2. Use both eye focus and hand rays at the same time:
There might be instances where you want to be more specific which type of focus pointers can trigger certain events and allow for simultaneously using multiple far interaction techniques.
For example: In your app, a user can use far hand rays to manipulate some holographic mechanical setup - e.g., grab and hold some distant holographic engine parts and hold them in place. While doing so, the user has to go through a number of instructions and record her/his progress by marking off some check boxes. If the user has her/his hands not busy, it would be instinctual to simply touch the check box or select it using a hand ray. However, if the user has her/his hands busy, as in our case holding some holographic engine parts in place, you want to enable the user to seamlessly scroll through the instructions using their eye gaze and to simply look at a check box and say "check it!".
To enable this, you need to use eye-specific EyeTrackingTarget script that is independent from the core MRTK FocusHandlers and will be discussed further below.
1. Use generic focus and pointer handlers
If eye tracking is set up correctly (see Basic MRTK setup to use eye tracking), enabling users to select holograms using their eyes is the same as for any other focus input (e.g., head gaze or hand ray).This provides the great advantage of a flexible way to interact with your holograms by defining the main focus type in your MRTK Input Pointer Profile depending on your user's needs, while leaving your code untouched. This allows for switching between head or eye gaze without changing a line of code or replace hand rays with eye targeting for far interactions.
Focusing on a hologram
To detect when a hologram is focused, use the 'IMixedRealityFocusHandler' interface that provides you with two interface members: OnFocusEnter and OnFocusExit.
Here is a simple example from ColorTap.cs to change a hologram's color when being looked at.
public class ColorTap : MonoBehaviour, IMixedRealityFocusHandler
{
    void IMixedRealityFocusHandler.OnFocusEnter(FocusEventData eventData)
    {
        material.color = color_OnHover;
    }

    void IMixedRealityFocusHandler.OnFocusExit(FocusEventData eventData)
    {
        material.color = color_IdleState;
    }
    ...
}
Selecting a focused hologram
To select a focused hologram, use PointerHandler to listen for input events to confirm a selection. For example, adding the IMixedRealityPointerHandler will make them react to simple pointer input. The IMixedRealityPointerHandler interface requires implementing the following three interface members: OnPointerUp, OnPointerDown, and OnPointerClicked.
In the example below, we change the color of a hologram by looking at it and pinching or saying "select".
The required action to trigger the event is defined by eventData.MixedRealityInputAction == selectAction whereby we can set the type of selectAction in the Unity Editor - by default it's the "Select" action. The types of available MixedRealityInputActions can be configured in the MRTK Profile via MRTK Configuration Profile -> Input -> Input Actions.
public class ColorTap : MonoBehaviour, IMixedRealityFocusHandler, IMixedRealityPointerHandler
{
    // Allow for editing the type of select action in the Unity Editor.
    [SerializeField]
    private MixedRealityInputAction selectAction = MixedRealityInputAction.None;
    ...

    void IMixedRealityPointerHandler.OnPointerUp(MixedRealityPointerEventData eventData)
    {
        if (eventData.MixedRealityInputAction == selectAction)
        {
            material.color = color_OnHover;
        }
    }

    void IMixedRealityPointerHandler.OnPointerDown(MixedRealityPointerEventData eventData)
    {
        if (eventData.MixedRealityInputAction == selectAction)
        {
            material.color = color_OnSelect;
        }
    }

    void IMixedRealityPointerHandler.OnPointerClicked(MixedRealityPointerEventData eventData) { }
}
Eye-gaze-specific BaseEyeFocusHandler
Given that eye gaze can be very different to other pointer inputs, you may want to make sure to only react to the focus input if it is eye gaze and it is currently the primary input pointer.
For this purpose, you would use the BaseEyeFocusHandler which is specific to eye tracking and which derives from the BaseFocusHandler.
As mentioned before, it will only trigger if eye gaze targeting is currently the primary pointer input (i.e., no hand ray is active). For more information, see How to support eye gaze + hand gestures.
Here is an example from EyeTrackingDemo-03-Navigation.unity.
In this demo, there are two 3D holograms that will turn depending on which part of the object is looked at:
If the user looks at the left side of the hologram, then that part will slowly move towards the front facing the user.
If the right side is looked at, then that part will slowly move to the front.
This is a behavior that you may not want to have active at all times and also something that you may not want to accidentally trigger by a hand ray or head gaze.
Having the OnLookAtRotateByEyeGaze
attached, a GameObject will rotate while being looked at.
public class OnLookAtRotateByEyeGaze : BaseEyeFocusHandler
{
    ...

    protected override void OnEyeFocusStay()
    {
        // Update target rotation
        RotateHitTarget();
    }

    ...

    ///
    /// This function computes the rotation of the target to move the currently
    /// looked at aspect slowly to the front.
    ///
    private void RotateHitTarget()
    {
        // Example for querying the hit position of the eye gaze ray using EyeGazeProvider
        Vector3 TargetToHit = (this.gameObject.transform.position - InputSystem.EyeGazeProvider.HitPosition).normalized;

        ...
    }
}
Check the API documentation for a complete list of available events of the BaseEyeFocusHandler:
- OnEyeFocusStart: Triggered once the eye gaze ray starts intersecting with this target's collider.
- OnEyeFocusStay: Triggered while the eye gaze ray is intersecting with this target's collider.
- OnEyeFocusStop: Triggered once the eye gaze ray stops intersecting with this target's collider.
- OnEyeFocusDwell: Triggered once the eye gaze ray has intersected with this target's collider for a specified amount of time.
2. Independent eye-gaze-specific EyeTrackingTarget
Finally, we provide you with a solution that let's you treat eye-based input completely independent from other focus pointers via the EyeTrackingTarget script.
This has three advantages:
- You can make sure that the hologram is only reacting to the user's eye gaze.
- This is independent from the currently active primary input. Hence, you can process multiple inputs at once - for example, combining fast eye targeting with hand gestures.
- Several Unity events have already been set up to make it fast and convenient to handle and reuse existing behaviors from within the Unity Editor or via code.
There are also some disadvantages:
- More effort to handle separate inputs individually.
- No elegant degradation: It only supports eye targeting. If eye tracking is not working, you require some additional fallback.
Similar to the BaseFocusHandler, the EyeTrackingTarget comes ready with several eye-gaze-specific Unity events that you can conveniently listen to either via the Unity Editor (see example below) or by using AddListener() in code:
- OnLookAtStart()
- WhileLookingAtTarget()
- OnLookAway()
- OnDwell()
- OnSelected()
In the following, we walk you through a few examples for how to use EyeTrackingTarget.
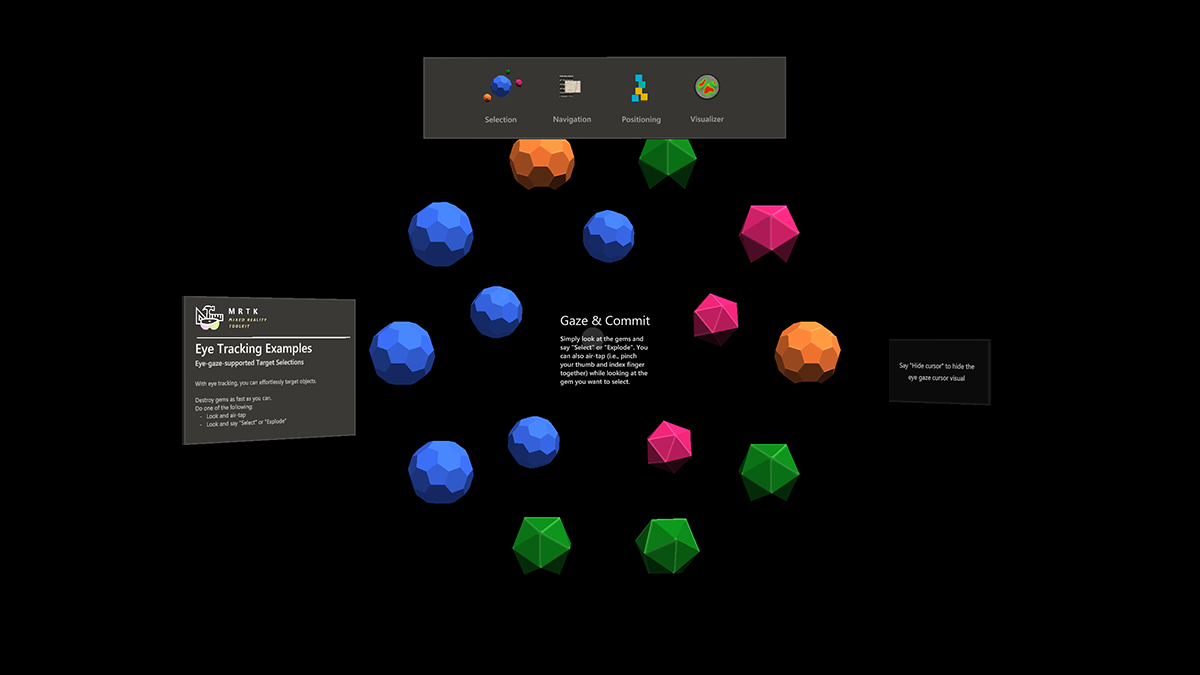
Example #1: Eye-supported smart notifications
In EyeTrackingDemo-02-TargetSelection.unity, you can find an example for 'smart attentive notifications' that react to your eye gaze. These are 3D text boxes that can be placed in the scene and that will smoothly enlarge and turn toward the user when being looked at to ease legibility. While the user is reading the notification, the information keeps getting displayed crisp and clear. After reading it and looking away from the notification, the notification will automatically be dismissed and fades out. To achieve all this, there are a few generic behavior scripts that are not specific to eye tracking at all, such as:
The advantage of this approach is that the same scripts can be reused by various events. For example, a hologram may start facing the user based on a voice commands or after pressing a virtual button. To trigger these events, you can simply reference the methods that should be executed in the EyeTrackingTarget script that is attached to your GameObject.
For the example of the 'smart attentive notifications', the following happens:
OnLookAtStart(): The notification starts to...
- FaceUser.Engage: ... turn toward the user.
- ChangeSize.Engage: ... increase in size (up to a specified maximum scale).
- BlendOut.Engage: ... starts to blend in more (after being at a more subtle idle state).
OnDwell(): Informs the BlendOut script that the notification has been looked at sufficiently.
OnLookAway(): The notification starts to...
- FaceUser.Disengage: ... turn back to its original orientation.
- ChangeSize.Disengage: ... decrease back to its original size.
- BlendOut.Disengage: ... starts to blend out - If OnDwell() was triggered, blend out completely and destroy, otherwise back to its idle state.
Design consideration: The key to an enjoyable experience here is to carefully tune the speed of any of these behaviors to avoid causing discomfort by reacting to the user’s eye gaze too quickly all the time. Otherwise this can quickly feel extremely overwhelming.
Example #2: Holographic gem rotates slowly when looking at it
Similar to Example #1, we can easily create a hover feedback for our holographic gems in EyeTrackingDemo-02-TargetSelection.unity scene that will slowly rotate in a constant direction and at a constant speed (in contrast to the rotation example from above) when being looked at. All you need is to trigger the rotation of the holographic gem from the EyeTrackingTarget's WhileLookingAtTarget() event. Here are a few more details:
Create a generic script that includes a public function to rotate the GameObject it is attached to. Below is an example from RotateWithConstSpeedDir.cs where we can tweak the rotation direction and speed from the Unity Editor.
using UnityEngine;

namespace Microsoft.MixedReality.Toolkit.Examples.Demos.EyeTracking
{
    /// <summary>
    /// The associated GameObject will rotate when RotateTarget() is called based on a given direction and speed.
    /// </summary>
    public class RotateWithConstSpeedDir : MonoBehaviour
    {
        [Tooltip("Euler angles by which the object should be rotated by.")]
        [SerializeField]
        private Vector3 RotateByEulerAngles = Vector3.zero;

        [Tooltip("Rotation speed factor.")]
        [SerializeField]
        private float speed = 1f;

        /// <summary>
        /// Rotate game object based on specified rotation speed and Euler angles.
        /// </summary>
        public void RotateTarget()
        {
            transform.eulerAngles = transform.eulerAngles + RotateByEulerAngles * speed;
        }
    }
}
Add the
EyeTrackingTargetscript to your target GameObject and reference the RotateTarget() function in the UnityEvent trigger as shown the screenshot below: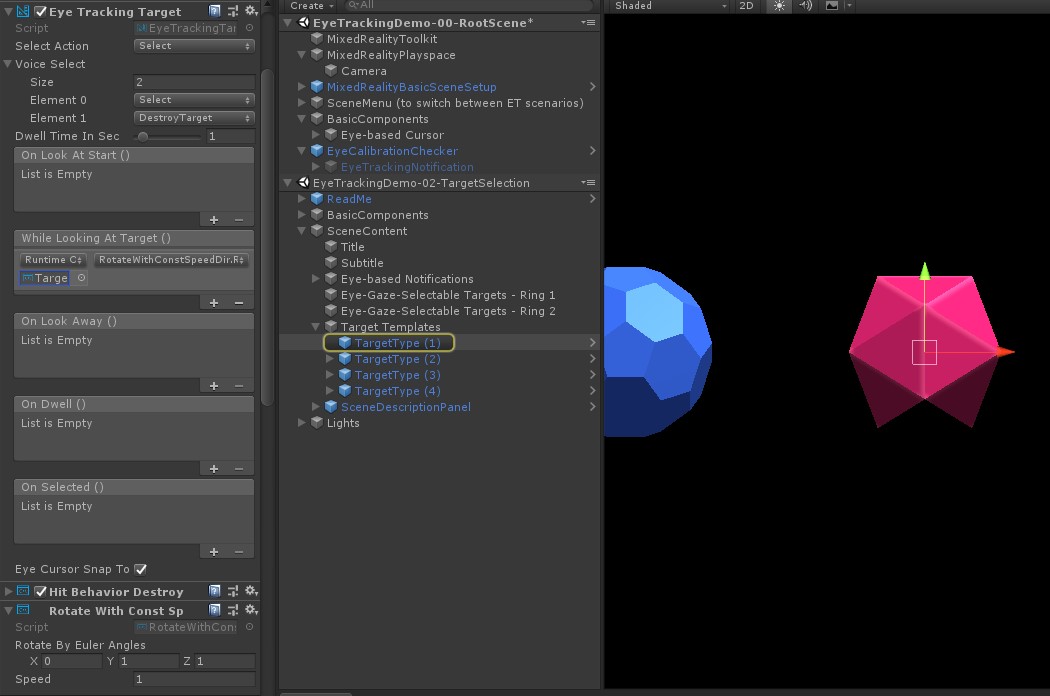
Example #3: Pop those gems aka multi-modal eye-gaze-supported target selection
In the previous example, we have shown how easy it is to detect whether a target is looked at and how to trigger a reaction to that. Next, let's make the gems explode using the OnSelected() event from the EyeTrackingTarget. The interesting part is how the selection is triggered. The EyeTrackingTarget
allows for quickly assigning different ways to invoke a selection:
Pinch gesture: Setting the 'Select Action' to 'Select' uses the default hand gesture to trigger the selection. This means that the user can simply raise their hand and pinch their thumb and index finger together to confirm the selection.
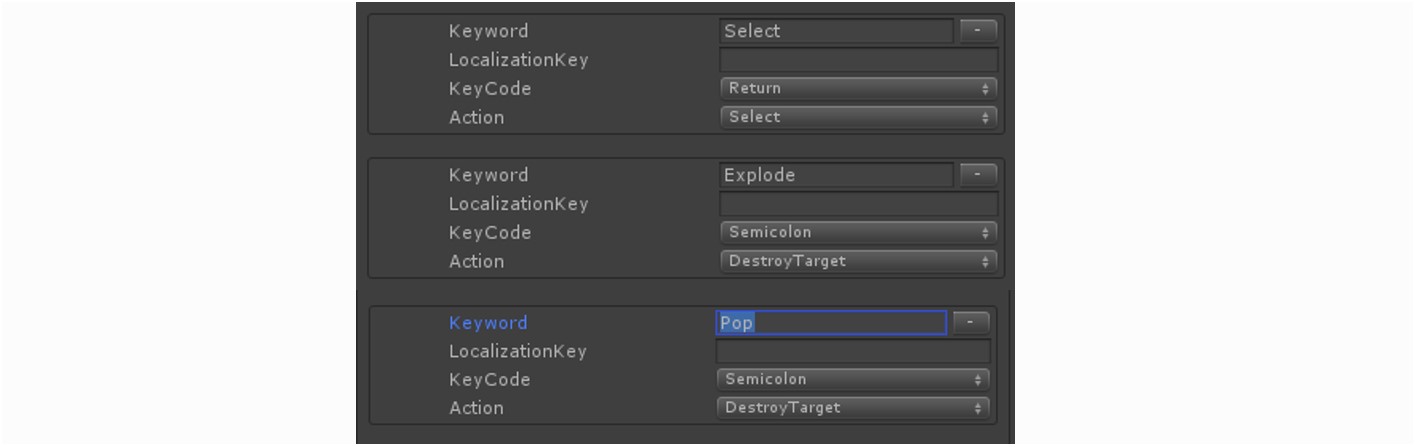
Say "Select": Use the default voice command "Select" for selecting a hologram.
Say "Explode" or "Pop": To use custom voice commands, you need to follow two steps:
Set up a custom action such as "DestroyTarget"
- Navigate to MRTK -> Input -> Input Actions
- Click "Add a new action"
Set up the voice commands that trigger this action such as "Explode" or "Pop"
- Navigate to MRTK -> Input -> Speech
- Click "Add a new speech command"
- Associate the action you just created
- Assign a KeyCode to allow for triggering the action via a button press
When a gem is selected it will explode, making a sound and disappear. This is handled by the HitBehaviorDestroyOnSelect script. You have two options:
- In the Unity Editor: You could simply link the script that is attached to each of our gem templates to the OnSelected() Unity event in the Unity Editor.
- In code:
If you don't want to drag and drop GameObjects around, you can also simply add a event listener directly to your script.
Here's an example from how we did it in theHitBehaviorDestroyOnSelectscript:
/// <summary>
/// Destroys the game object when selected and optionally plays a sound or animation when destroyed.
/// </summary>
[RequireComponent(typeof(EyeTrackingTarget))] // This helps to ensure that the EyeTrackingTarget is attached
public class HitBehaviorDestroyOnSelect : MonoBehaviour
{
    ...
    private EyeTrackingTarget myEyeTrackingTarget = null;

    private void Start()
    {
        myEyeTrackingTarget = this.GetComponent<EyeTrackingTarget>();

        if (myEyeTrackingTarget != null)
        {
            myEyeTrackingTarget.OnSelected.AddListener(TargetSelected);
        }
    }

    ...

    ///
    /// This is called once the EyeTrackingTarget detected a selection.
    ///
    public void TargetSelected()
    {
        // Play some animation
        // Play some audio effect
        // Handle destroying the target appropriately
    }
}
Example #4: Use hand rays and eye gaze input together
Hand rays take priority over head and eye gaze targeting. This means, if hand rays are enabled, the moment the hands come into view, the hand ray will act as the primary pointer. However, there might be situations in which you want to use hand rays while still detecting whether a user is looking at a certain hologram. Easy! Essentially you require two steps:
1. Enable the hand ray: To enable the hand ray, go to Mixed Reality Toolkit -> Input -> Pointers. In the EyeTrackingDemo-00-RootScene where the Mixed Reality Toolkit is configured once for all of the eye tracking demo scenes, you should see the EyeTrackingDemoPointerProfile. You can either create a new Input Profile from scratch or adapt the current eye tracking one:
- From scratch: In the Pointers tab, select the DefaultMixedRealityInputPointerProfile from the context menu. This is the default pointer profile that already has the hand ray enabled! To change the default cursor (an opaque white dot), simply clone the profile and create your own custom pointer profile. Then replace DefaultCursor with EyeGazeCursor under Gaze Cursor Prefab.
- Based on the existing EyeTrackingDemoPointerProfile:
Double-click the EyeTrackingDemoPointerProfile and add the following entry under Pointer Options:
- Controller Type: 'Articulated Hand', 'Windows Mixed Reality'
- Handedness: Any
- Pointer Prefab: DefaultControllerPointer
2. Detect that a hologram is looked at:
Use the EyeTrackingTarget script to enable detecting that a hologram is looked at as described above. You can also take a look at the FollowEyeGaze sample script for inspiration as this is showing a hologram following your eye gaze (e.g., a cursor) whether hand rays are enabled or not.
Now, when you start the eye tracking demo scenes, you should see a ray coming from your hands. For example, in the eye tracking target selection demo, the semi-transparent circle is still following your eye gaze and the gems respond to whether they are looked at or not, while the top scene menu buttons use the primary input pointer (your hands) instead.